Wednesday, December 15, 2010

The Über-Jay MarkII - Part One

Hi there!

The Über-Jay Mark II hit the road one month ago. It is both a second prototype as it is a commissioned build.

The customer agreed that I will decide later whether I keep this one and build another one for him or not. It's still a prototype right? ;)

The more I play the first one the better I understand it, and now that he's finally hitting the stage I'll know him even better. The Mark II will be the by-product of this playing/building process.

The basic specs are:

4 strings. 22 frets.

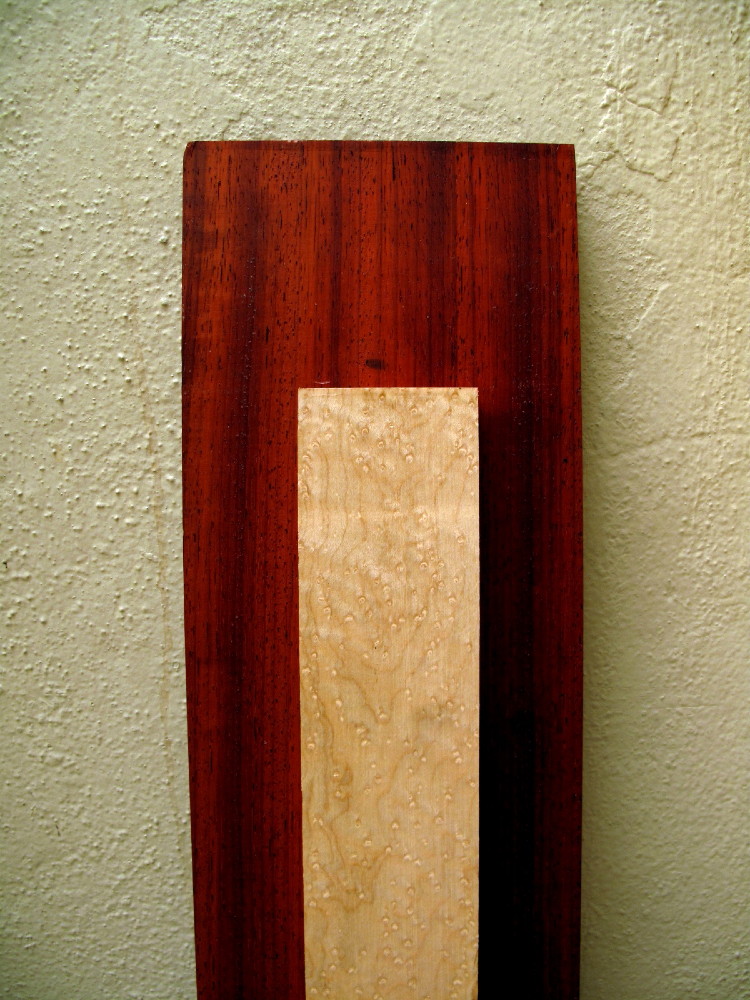
Swamp Ash chambered body. Camphor Burl top. Birdseye Maple/Padauk neck. Curly Maple F/B

2 J p-ups (brand to be decided). ETS bridge. Custom made black and chrome hardware.

Here's the first round of pictures.

The combination of Swamp Ash and Camphor Burl should enhance further the lines of
the body. Compared to the classy black//white/gold look of the first Ü-Jay, this one will probably have more bite :->

Under the saw the Camphor Burl smells great...spicy...I think I can get high on this.

I am more concerned with the look of the back since the front will be hidden. So what you see in the picture is the back, not a left handed model.

These are two 13/64 (5mm) slices taken from the back of each half. The lower one will be used to make a cavity cover with matching grain.

As you can see there isn't much left to chamber once the carving of the back is taken into account. But that's shaving off weight too, isn't it?


The chamber and the cavity are connected by a small channel to make wiring easier. At a later stage I will route a similar channel between neck p-up/chamber and bridge p-up/cavity.


The neck laminates - BE Maple and Padauk. I just love the way they complement each other and the Ash/Camphor Burl of the body

Here is the body with top glued on and - if you can see it at all - the black veneer in between. I can see it's gonna look great.


Which made me think... one subdued feature of the original Ü-J to me is the very pronounced back contour. This time around I wanted to try something different.

There you go: red veneer all over the back. It's pressure dyed and the color is really vibrant. I'd say it's Maple. Once the Ash laminate is sanded to the final shape, the red veneer will outline the contour.


BTW, you might notice that I have re-routed the cavity and reduced the neck heel further compared to the previous build.

Here's the neck roughly shaped, and the black veneer clamped to the headstock. Later I will add the Camphor burl veneer. This time around I have shaped the headstock just like the original Fender, so the veneer needs a bit of bending.


I spent the whole afternoon filling every pore of the room with fine Camphor dust. The front is almost done; The back - where the fun is - is half way through. I'll finish tomorrow.


I sanded only up to 100. This time around I'm gonna use micro mesh up to 12000 grit.
There might be more shaping to be done - mostly the lower horn scoop, the upper chest area contour and the neck heel. You should be able to see some thin red lines on the back marking how far in the contour can go without hitting the chambers.


I'm also happy with how the grain of the top matches that of the body. In fact, only where the contour is more aggressive sometimes they don't. It doesn't seem to be a bother given the presence of the red veneer. Well, to me anyway


If I taper those areas even further the grain orientation will change again. Who knows, maybe they'll end up matching perfectly.


I've worked the contour so as there is always a line running parallel on both sides of the veneer. This way there are basically three lines following the body profile and merging at the two horns tips.

This is another detail where the Mark1 and Mark2 differ. It should look quite neat with glossy finish.
I am particularly happy about the way the cover is working. If not for the marker line it would be virtually invisible. Then the line will go...


When you take out the cover this is what you're gonna see. I like adding some unexpected elements to a design. To me it keeps the experience fresh and intriguing overtime.


The jack recess I carved on the first über works very well. It protects the jack and makes it easy to find the hole when plugging in. So I'm using it on this and future builds. It works even better with this new cavity cover

The body's ready, sanded to a 180 grit. I won't go beyond that until p-ups cavities and neck pocket are routed. Unfortunately both p-ups and bridge delivery dates have been delayed due to Xmas rush.

I could work on the neck then. Wait... The CF rods haven't arrived yet... delayed due to Xmas rush... crisis? what crisis?

Ok, not everything is being delayed. I just received two new metal knobs prototypes - a small size dome shape and a new slim design, finished in both Black and Nickel Chrome plated Aluminum. I'll upload pictures next time.

New parts for the headstock anchors are being made - prototypes by end of next week - and so is the über-jay logo. Yeah...

Thanks for following

O(=<

Saturday, December 4, 2010

Building the uber-J. Part fortheen - at last!


Ladies and gentlemen, the Über-Jay is finally here. Actually it has been here since October. My bad for not updating the blog.

It weights 3.6 Kg. or 7.7 lb. A comparable bass I own - also a 4 stringer, Mahogany body and Rock Maple neck - weighs 4 kg or 8.8 pounds.

Having said so, it's obvious to me that the absence of tuners on the headstock makes the biggest difference, changing the overall weight distribution. This makes the bass feel very neutral and a lot lighter than numbers would suggest. The sense of fatigue on the left shoulder is basically gone.


I have rearranged the knobs order to suit my playing style. From p-up to bridge: Balance/Tone/Volume.

It reflects the way I believe players prioritize controls. I have asked around a lot and I found out that Volume is actually the least used of all. It also reflects the way I use them - with B being the most important and V the least.


I then decided to make brass knobs to replace the plastic ones. The knobs are plain, no dot marker or line. I think it's unnecessary. The thing is, if the mark is placed on the top I won't be able to see it and I usually don't look at them anyway.

From the side the Allen would be visible enough; better yet, my fingers would feel it more than they would a dot. That together with the center indent does the trick - to me that is.

I mounted the knobs so as the Allen screws are all facing the player when T/B knobs are in center position and V knob is at max vol.

It looks so much better with such a little change, doesn't it?


Click here to listen to a sound clip.

I recorded it with:

Digital recorder Zoom H4. settings in flat. Stereo microphone at about 50cm from amplifier.

No effects whatsoever. The sound is straight from the amp - setting in flat. One 12" speaker. Not the best for the sound I like. But I basically wanted to recreate the conditions one usually faces when playing a bass at the shop.

As you listen to the clip you should hear - in this order:

1 - finger style, only neck p-up. Tone at zero - basically full treble cut. Right hand moving from bridge to neck position. Progressive increment of trebles.

2- f/style, only bridge p-ups selected. Right hand playing from bridge to neck. Tone at 50%

3 - p-up blend in center position with slight variations +/- 20%. Tone at 50%

4 - slap with 2 p-ups center position and variations +/- 20% mix. Tone on bass at 50%. Mid cut on amp between 500Hz and 2Khz.

Strings: roundwound stainless steel .40/105. The action is impossibly low


At 1:30 and around 2:20-2:30 you can hear bending on open strings and harmonics. That's possible because this anchoring system - as opposed to using tuners - positions them at an angle sharp enough to do without string retainers.
So, I use my left hand to bend one or more strings anywhere between nut and the h/stock ferrules.

In my experience, this is possible only on some basses with tilt back head stock and usually only on the second and third strings. Notable exception being the Status Kingbass with optional Bendwell.


To wrap it up.... I am used to playing boutique basses. I have owned or played long enough some of the best basses around. I still own five of them. I can humbly say that I can tell a good - or bad - bass just by lifting it up or playing it unplugged.

So, how does the Über-Jay compares with the cream of basses? Trying to be as detached as possible, I'd say very very well.

There are areas where it can be improved - and it will. The neck can be thinner. The body can be chambered. An accent line would have been nice. It doesn't display the same level of craftsmanship as the others I own... yet ;)


But the bottom line is, I am a very fussy player. The bass I pick is the best I can put my hands on. Since October, that bass has been the Ü-J.

Thanks for reading this far.

O(=<

ps: Future projects.

I have started a new build. It's called the Mark II. Simply because it pushes the Ü-J design forward and implements ideas I had while building the first one.

The overwhelming response this build has met with - from fellow bass players all over - has been extremely encouraging. The next build is already spoken for and I am discussing two more builds as we speak. I never thought it would get this good :)

Monday, August 23, 2010

Building the uber-J. Part Thirteen.

What the heck!

I am spraying and sanding and spraying and sending. It surely beats unloading trucks at the fish market. But probably just by a tiny margin. And not because of the smell.

I don't have much to say really other than Uber is now curing its tenth coating. But I wanted to upload pictures just the same. Because it is only apparently an uneventful stage of the build. From up close, coating after coating the wood comes to life and the various tiny details of the design start showing. So, here they come...

A few more rounds and I should be able to mount the pick-ups, hardware and frets. Hell, yeah!


Friday, August 20, 2010

Building the uber-J. Part Twelve.

Metal fatigue.


Since my last update I have fixed a few details I wasn't too happy with or I felt deserved improvement. Namely, covers, screws, brass parts and cavities.
The plate in the picture is now polished to a shine. Following leads and hunches I finally found someone who would engrave a line on it - not that easy due to the plate size. Kinda hard to photograph the entire line and keep it readable with reflections and all..... The complete line reads:

Uber-Jay n.1 Maurizio Caduto (my name) 2010. I like the ol' Auntie typeface

Next up - small screws. I was frankly unhappy with what I had. They were too big and didn't look sexy. IMHO there is almost nothing in the Screws Universe that looks better than a Allen. So......

These are 2mm diameter stainless steel Allen with nut. I also have a 4mm alternative. As an alternative I also bought a brass nut. I'll decide when I see how either look on the finished wood.

The first set of neck screws turned out too long and I needed a replacement. Again, I decided to investigate the Allen alternative.

All my Wal mount Allen screws at the neck - it's very cool! What I didn't know until recently is that the screw actually works together with a reverse thread nut that is inserted into the neck. Oh boy! I can own a Wal forever and I still discover something new.

So Allen it is. I'll have the screws gold plated to match the ferrules. BTW a review and pictures of my Mk1 fretless are available here.

And since I was on a spree, I decided to have the string anchors made in brass as a possibly better alternative to aluminum - both aesthetically and functionally. What the heck!

I have made a new truss-rod cover as the first carving wasn't tight enough. I want the cover to snap into position. So I did it again slightly bigger and while at that I found a piece that matches the HS grain almost perfectly.

The brass plate in the picture is the cavity cover's back, which I kept to a brushed finish.


Spray and sand, you slave!

This is truly a chore and it has to be repeated enough times to either loose your mental sanity or get fully intoxicated - whichever comes first.

I don't own the equipment to spray so I used that of the workshop where I go when the machine required is too big or expensive, or when I need counsel - that is, every other day.

First round of spraying and sanding, 400 sand paper. Then spray again and leave it to dry overnight. I kinda like it. The color of the wood is coming out incredibly rich.

Second sanding round. 400 sand paper. Then spray again and leave it to dry overnight. I had to work a little harder on a few spots, where droplets had solidified - cheeky little bastards.

Third round of sanding. 400 sand paper. Then spray again and leave it to dry overnight. I should hate it by now. Instead, I'm really digging it. It's so rewarding seeing the final look slowly surfacing.

It is far less rewarding having to fight all those droplets again. But at the least after the first session of sanding I'm not hitting the wood anymore. Learning with practice. Hell of a thing.


And this is where I am at the moment. I can't wait to finish this. At the same time I am enjoying the whole process. Particularly, the fact that I am wrong more often than not about timing. Most sections are taking longer than anticipated.


I have now learned that it is due to a number of factors.

1. This is a prototype and as much as I know where I'm heading to, I'm leaving the door open to some degree of improvisation.

2. I am a bloody perfectionist and it takes me time to get what I want, the way i want it.

3. Trial and error is time consuming. 4. Next time I'll have every single item ready BEFORE start the build - down to the smallest screw.


The thing is, if I were very good I could only predict so much of what's gonna happen in a prototyping scenario. I ain't that good - yet. Go figure!

But I'm having the ride of my life and I am already savoring the moment the Uber-J II will hit the workbench.

I am going to take my sweet revenge on all those little mistakes and oddities that punctuated this first attempt.

I am gonna enjoy that. Slowly, just the way i like it ;) Until then


Thanks for reading

O(=<


Wednesday, August 4, 2010

Building the uber-J. Part Eleven.

Bits and pieces.

Ok....so... a few things happened while I was absent from this blog and I've got quite a lot to cover so, here it goes....


Headstock ferrules - On the left is the one I made. On the right the one I bought. They are very similar. Only, the one I made is 1.5mm thinner and slightly smaller in diameter. Which works better since ferrule and anchor's size together must be smaller than the total HS thickness including about 4mm allowance for the screws.

I much prefer the look of brass to that of gold - it goes well with the brass nut too. BTW the nut will be slimmer and with less sharp angles than this - I'll do that when it's time to fix it to the neck.


I used this thing here to carve the ferrules. It's a cheep China-made drill press - which over here costs about $80. I can do most of what I need with it.

Everything else is pretty much done by hand. I hand sawed the part from the rod - thicker than I needed coz the cut was bound to be irregular.

On a block of scrape wood I drilled a cavity exactly the size I wanted the final brass part to be (thickness and diameter). With the rough brass sticking out of the cavity I shaved off the excess metal on both sides and end up with a flat, leveled top and bottom. That is crucial to drill straight through the center.

I drilled the hole first, then the beveled part - which was made with the bit you see in the picture. Finally with sandpaper and steel wool I shaved off tiny irregularities and sharp edges.

Once I figured out how to go about with it it took me about 20 min each. Maybe the next batch will take me less if I don't screw up too much


I made this t-rod cover in Macassar Ebony, trying to match the grain. Eventually I will route a shallow recess on the headstock for the cover to sit into.


I've drilled the headstock cavities. The ferrules are flush with the wood. Right now are only sitting there for picture purpose ;) I just luuuuuv it!

The little MOP inlay is a symbol I have used for years to sign off my emails.... O(=< ....... To me it looks like a bass. And it just so happens that my fellow musicians call me Mr. Bassman......yeah.....and this symbol does look like a man when you turn it 90ºCW.... so Bass- man. Perfect! :) ( some say it looks like a mairmaid......or in the position of the picture it reads Vivo...which is Italian for Alive......OK...enough meanings!

The name Uber-J will likely be engraved on the t-rod cover.


The elec. cavity is done. I must confess I'm not 100% pleased with it - never work when you're in a hurry.... well... it will be fine after some more routing and sanding.

I routed a jack recess to try and achieve a few goals. 1. jack doesn't stick out. 2. jack points upward to facilitate inserting cable behind strap 3. in case the cable is not secured to the strap it won't be disconnected accidentally. We'll see if that works pretty soon. ;)

I won't be able to spray until next week. So, this next few days I'll finish the cavity; cut the cover - brass or M Ebony.... mm...brass, I think; route the recess for the t-rod cover; insert the side dots....make the slot for the nut.

Before spraying I will assemble every part - p-ups and el. excluded - and string it to double check that everything is right.

I will also test a few positions for the strap locks, just to make sure the bass is both well balanced and the 22nd fret positioned where I like it - clear of the thumb, that is.

till next update ;)

O(=<

Friday, July 23, 2010

Wood and p-ups. Never ending story.

Is wood or p-ups responsible for a bass's sound?

Frankly we are all tired of hearing this question and the ensuing verbal fight. But I keep on bumping in it in one form or another.
I've steered clear from it until now, as it produces more foes than friends. But maybe I've been a coward. So, lets engage.


As it is formulated, it's as pointless a Q as it is impossible to answer to. Even if The One Answer did exist, it would be of little help in building a superior bass.

For argument sake, let's forget that wood's influence on tone in electric basses is minimal compared to acoustic instruments and say that Tone is in the woods. So what? Are we going to choose the best sounding woods - which is what top makers do anyway - and screw the rest? No, right?

So, it's in the electronics. Sure, lets get the cream of the electronics crop then. I've got an old frying pan sitting there, kiln-dried to perfection for the body.

No? OK then, so it is a pointless Q because whatever A we get will be basically useless.
And it is an impossible Q because it is far too generic. Is Manchester United a stronger team than AC Milan? Wanna fight? Is Ferrari a better car than Lamborghini? You and me, outside, now!

We would have to agree - as we usually end up doing when exhausted enough - that wood and pick-ups are only two of the many components linked in a chain reaction - and we're back to square one.

But if MU beats AC M hands down, then asking 'Why did this happen this time around?' might take AC M to recognize mistakes and change strategy for the next match.

Try this for a change - What do truly great basses have in common?

Is it the wood? Yes, but a Steinberger, Basslab, Status, Modulus and Moses would prove that wrong.

Then it's the p-ups. Yes. But a cheep bass mounting Alembic p-ups and electronics will never quite sound like an Alembic.

Hardware then? Yes. But what exactly. A Furlanetto sounds like a Furlanetto with either brass or wood bridge/nut.


Alembic, Sadowsky, Status, Wal and others use own proprietary electronics. MTD, Steinberger, Fodera and others use p-ups and electronics custom-made for them by top makers. So there is no apparent consistency here either.

What is then the common denominator across great basses?


Here's my personal experience. When I lift a great bass I know it with my eyes closed. I instantly feel its stiffness and can almost hear its voice under my fingers.

I lift up a so and so bass and can only feel the weight of parts assembled together.


Great woods assembled with so and so built quality will still sound crap. Yet a top bass sound great even unplugged.
Whether a bass is made of wood, graphite, metal, stone or kryptonite is quite irrelevant to me. I choose between graphite and wood depending on music style and/or mood of the day.


But stiffness is everything. Every great bass I have played is stiff, whatever the building style.
Be it a neck through, bolt on, set neck one thing they have in common is that you can't feel the individual parts. The bass feels like one.

Of course great el/p-u/hw will make a so and so bass sound better. But more to the point, the same parts will sound helluvalot better on a bass built the way a great bass should be.

And that to me should end the wood vs. p-ups argument. However there is a more interesting angle to it. Once construction becomes the cornerstone of great basses, then everything else take a different meaning.

Because it all becomes product of a Vision - of unique sound, playability, look and feel. Which is to me a lot more interesting and insightful than finding the silver bullet. Players are interested in great basses with great personality. No one want the Perfect One - if the is such a thing.

Some makers believe in wood tone. They keep electronics, p-ups and hardware the same for every build.
Then they experiment with woods. Whichever bass they make will share the same voice. But you'll be able to appreciate subtle differences due to wood choice. It's a wonderful thing. Try a few MTD.

Some others will sound almost the same regardless of woods choice. An Alembic always sounds like an Alembic and so does a Wal or a Status. And God bless them for that.

In either cases, that's the Brand's Voice.

To this point, some time ago I watched a very interesting experiment on UK TV. A guy claimed he could tell a bass only by listening to it.

So there he was, blindfolded and with a dozen basses behind him. One by one the instruments were played by Mr. Mark King, no less. Heck, the guy nailed them
all! Which goes to prove that great basses have each a unique voice.

Stiffness is the foundation of it. Each maker achieves it in the way that is more akin to his nature and craft. He then blends in p-ups, electronics and hardware to perfect his unique vision.


Different vision = Different tone.
Which
is why there is no universally acceptable A to the Wood vs P-ups Q. And nothing to learn from it.
I might still not know how to build an Alembic. But I sure as hell know which way to look to build my very own.

There. I said it.

O(=<